Accessing Data in Jupyter Notebook
Tutorial Goal
In this tutorial we will create a Jupyter notebook that fetches data from a Nexla dataset and prints it as rows of data. Once setup, this notebook will always have access to the most recent data from the Nexla dataset.
Follow along the steps below and you'll be up and running in minutes. Or just skip ahead to the bottom and download the sample Jupyter notebook we created for this tutorial.
The Philosophy
Jupyter notebooks are a great tool for doing data-analysis. But getting data in a shape where it is ready to be analysed is a non-trivial challenge considering the heterogenity of data sources (APIs, SaaS services, Warehouses, File Storage systems, etc.), never mind other operational challenges of managing data pipelines.
With Nexla, you can get the best of both worlds:
- Use Nexla's no-code / low-code UI, API, or CLI to quickly setup and manage all your data pipelines
- Use Nexla's Pandas / Jupyter integration to access your data right within your notebook and perform any analysis task.
Step 1: Create Nexla Pandas Destination
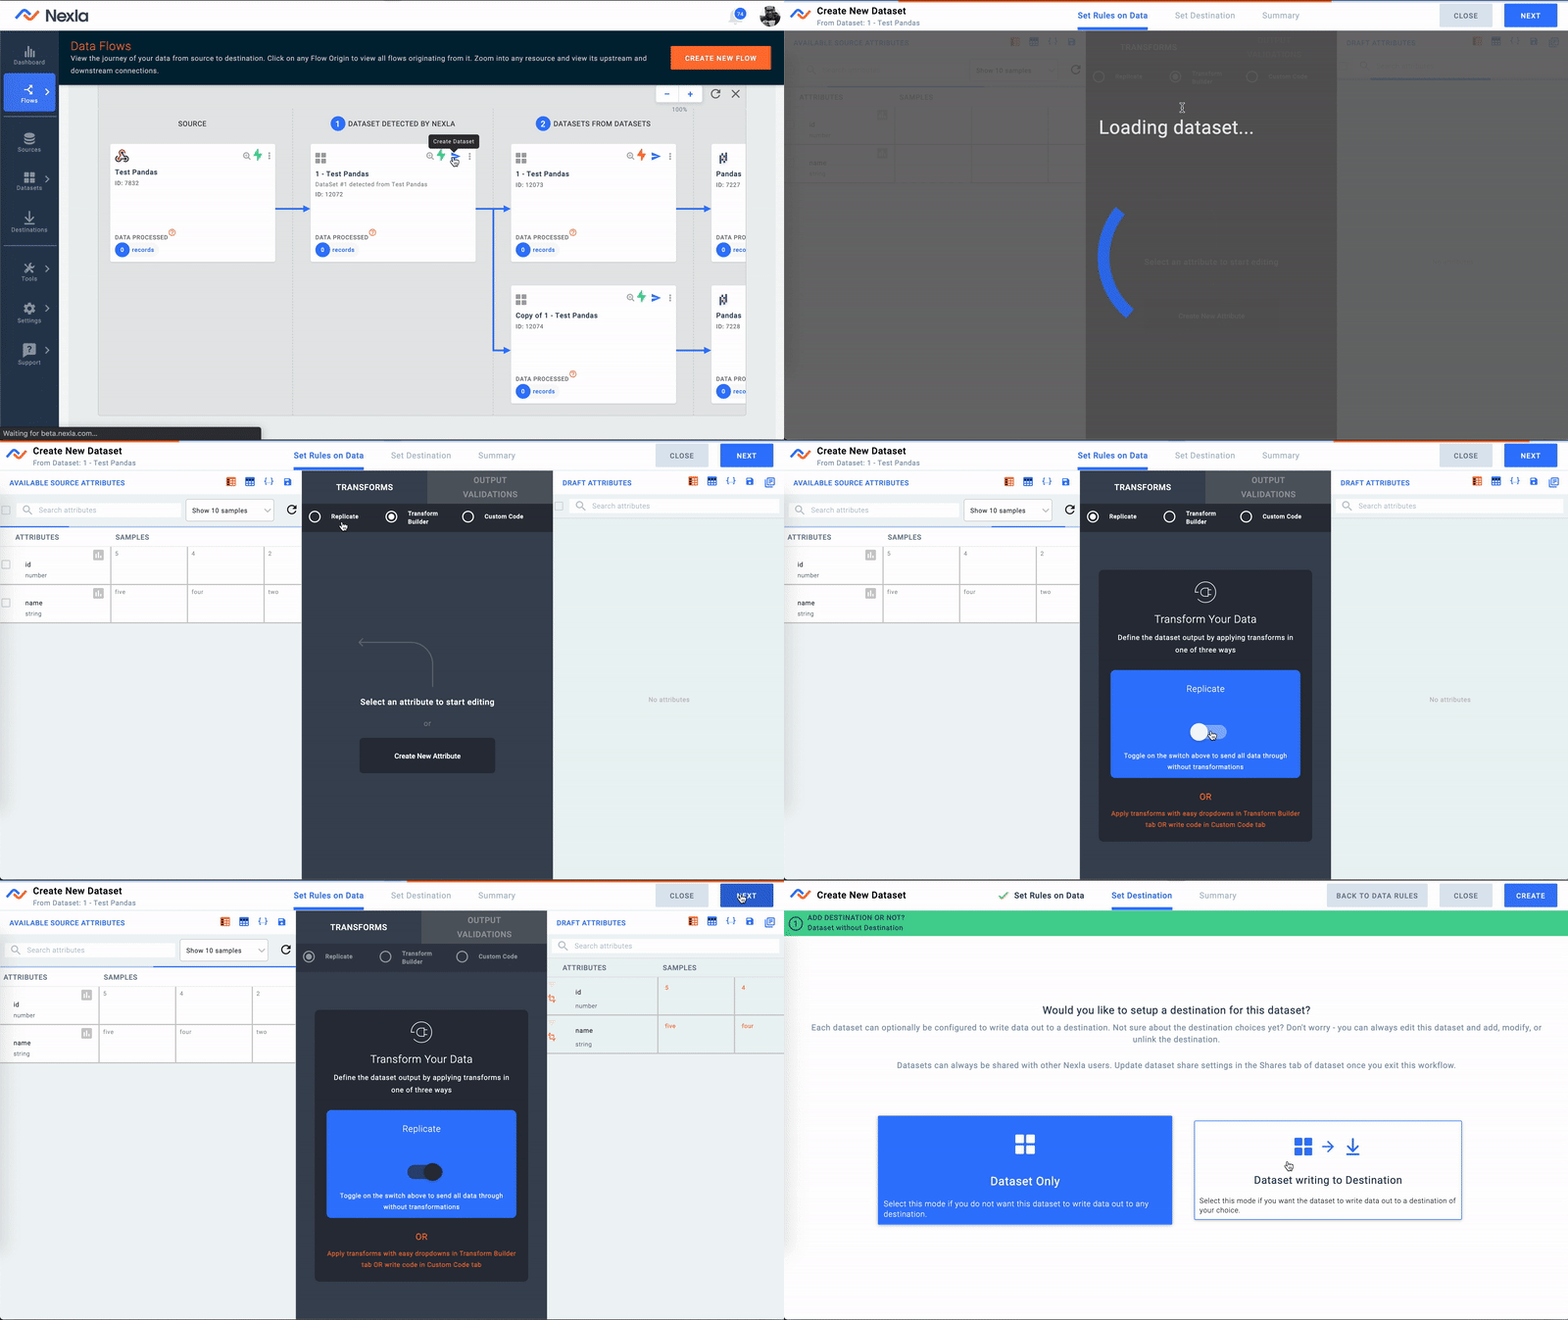
Since Nexla homogenizes data from disparate sources into similar looking datasets, let's start from the dataset we wish to use in our Jupyter notebook. We'll use Nexla UI for this tutorial, but we could do this step using Nexla API or Nexla CLI too.
- We'll in login to our Nexla UI instance and check out the Data Flow we want to work with. Next, we'll select the Dataset we wish to access in Jupyter.
- We can modify the Dataset with any transformation logic we wish. In this case, we just want to move the data as is.

Create Dataset
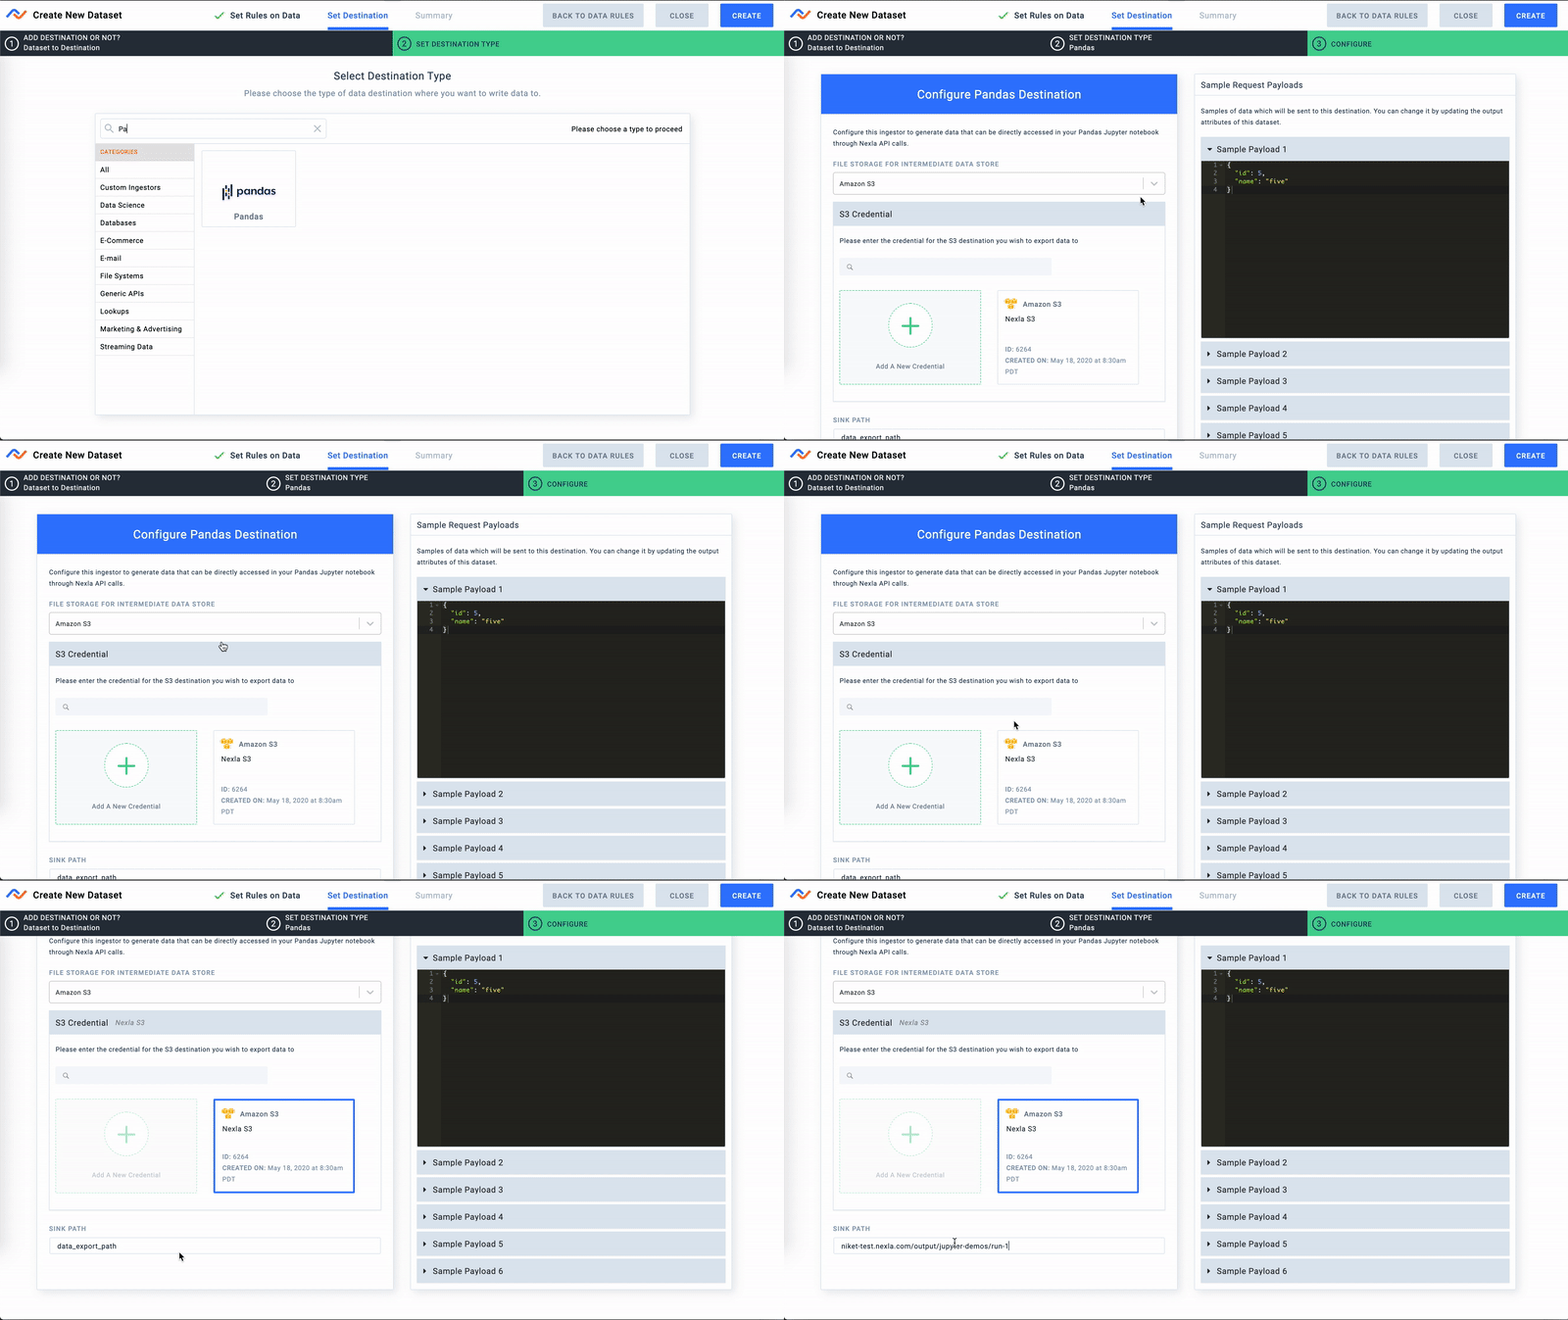
- Now we'll select Pandas as a Destination
- Finally, let's configure a storage location for this Pandas destination. This can be any file storage system supported by Nexla. For this demo we will use a path in our S3 bucket for storing files. Nexla will automatically catalog data files by date.

Configure Pandas Destination
That's it! We are all done with setting up the Data Flow. All we need is the Destination ID of this destination. For this tutorial we will work with Destination ID: 7228
For this tutorial we are using a dataset that happens to get data from a Webhook, but we could have used any other source and the steps to access would be the same. Check out our video tutorials or contact us for details.
Step 2: Install and Import Nexla CLI
This step needs to be executed only once
Let's download and install the Nexla CLI SDK to our local development machine. Easy peasy!
Now, for this tutorial we also need to be able to access the S3 bucket for downloading the data files generated by Nexla. We'll use Nexla's in-built S3 function for managing the download. In this step we just need to configure S3 access information. Checkout Boto3's configuration guide for storing aws_access_key_id and aws_secret_access_key
Perfect! We are now ready to start creating our notebook. Let's fire up a Jupyter notebook server and start a new notebook. First we will add a cell for importing required Nexla packages.
from nexla import nexla_auth
from nexla import nexla_sink
Step 3: Authenticate User Session
All Nexla requests need to be authenticated by fetching a short lived Access Token from Nexla UI. Let's add a new cell for launching the authentication window.
## Start a Nexla Authenticated Session
import webbrowser

## Enter the URL where you access your Nexla instance. Usually this will be https://dataops.nexla.io
## This will launch a new browser window where you can login to your Nexla session and get your Nexla API URL and Access Token
nexla_ui_url = '<Nexla UI URL>'

webbrowser.open(nexla_ui_url+'/token',1)
This new window will display a Nexla API URL and Access Token after successful login. Let's copy this over into our Jupyter notebook and call Nexla CLI's Auth method for starting an authenticated Nexla CLI sesssion.
## Copy Nexla API URL from the Nexla Session popup window and paste it below.
nexla_api_url = "<Nexla API URL>"

## Copy Access Token from the Nexla Session popup window and paste it below.
access_token = "<Nexla Access Token>"

auth = nexla_auth.Auth(api_base_url = nexla_api_url, access_token = access_token)
Once the output of this cell says You are now logged into Nexla CLI as <Your Username>[your email] we can move on to the next step.
Step 4: List Generated Destination Files
Now that we have an authenticated session going, we'll list out all data files generated by Nexla for this Pandas destination (ID: 7228). For this tutorial we will only use files generated in last 10 days, but Nexla CLI's get_sink_filesList allows me more controls.
## Enter the destination ID of your Pandas destination
sink_id = 7228

data_files_list = nexla_sink.DataSink.get_sink_filesList(auth, id=sink_id, days=10)

print(data_files_list)
Step 5: Download Remote Files
Next we need to download the files in this dynamic list of Parquet files generated by Nexla. Let's first create a local download area.
import os
download_path = os.path.join(os.getcwd(), 'tmp')
if not os.path.exists(download_path):
    os.mkdir(download_path)
Now we just need to call Nexla's S3 download function with the download_path and data_files_list.
## Step 6: Download files from your remote storage. For S3 storage, you can use Nexla's S3 download function below.
## Note that you will need boto3 or awscli to configure S3 access information before calling this method.

nexla_sink.DataSink.download_files_from_s3(file_paths=data_files_list, download_path=download_path)
Step 6: Load Data into Pandas Dataframe
Once we have the data files available locally within the Jupyter notebook server, we can process them and create a dataframe by calling standard Pandas Parquet file read methods.
import pandas as pd
import os

li = []

file_list = os.listdir(download_path)

for file in file_list:
    df = pd.read_parquet(os.path.join(download_path, file))
    li.append(df)
frame = pd.concat(li, axis=0, ignore_index=True)
Finish Line: Process Dataframe
That's it! We have a dataframe with a stream of data directly from the Nexla flow. As a proof of completion let's just print out the frame for sanity check.
print(frame)

   id   name
0   3  three
1   1    one
2   2    two
Sweet Success! With just a few clicks and few lines of code we have an automated flow that regularly ingests data from our source (Webhook), processes it desired, and then delivers it to our notebook within minutes.
As a final test, let's push 3 more records to the Webhook and (after a few minutes for Nexla to process and upload the files) let's re-reun this notebook. Here's what we will see in the final cell.
print(frame)

   id   name
0   3  three
1   1    one
2   2    two
3   6    six
4   4   four
5   5   five
Download Sample Notebook
Here's the final notebook that we created as part of this tutorial. Just enter your information in the relevant fields (Nexla API URL, Access Token, and Destination ID) and you are good to go!